こんにちは、Jurabiの品川です。
今回は、セマンティックウェブの技術を使って、簡易的なお寺検索エンジンを作ってみました。フロントエンドにはReact.js、バックエンドにはExpressを使います。(なぜお寺かというと、私が鎌倉付近に住んでいて、頻繁にお寺を目にする機会がある、という理由です。(笑)
この記事では、環境構築から実装、そしてセマンティックウェブの概要説明まで、解説します。セマンティックウェブやSPARQLに興味がある方、ReactとExpressでのアプリ開発に挑戦してみたい方は、ぜひ最後までご覧ください。
この記事でできること
- SPARQLクエリの基本文法を理解し、DBpediaからデータを取得できるようになる。
- React.jsとExpressを使った開発を体験できる。
- セマンティックウェブの概念を具体的な例で学ぶことができる。
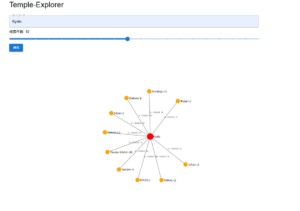
完成イメージ
ブラウザでの動作

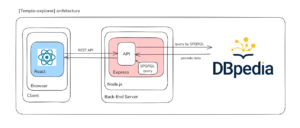
アーキテクチャ

画像が小さくて見づらい場合は、以下リンクをご確認ください。
https://link.excalidraw.com/readonly/WgKq2rk5shk0IYUezquQ
【事前知識】セマンティックウェブとSPARQLの基礎知識
RDFとは
RDF(Resource Description Framework)は、Web上のリソース(情報資源)を記述するためのフレームワークです。RDFは、データを「主語(Subject) - 述語(Predicate) - 目的語(Object)」のトリプル形式で表現します。
例えば、「東京は日本の首都である」という情報は、以下のように表現されます。
- 主語(Subject): 東京
- 述語(Predicate): 首都である
- 目的語(Object): 日本
RDFを用いることで、異なるデータソース間でも統一的なデータ表現が可能となり、機械がデータの意味を理解しやすくなります。
SPARQLとは
SPARQL(SPARQL Protocol and RDF Query Language)は、RDFデータに対してクエリを実行するためのクエリ言語です。位置づけ的な話をすると、SQLがリレーショナルデータベースに対するクエリ言語であるのに対し、SPARQLはセマンティックウェブ上のデータを検索・取得するためのクエリ言語、、といったような形です。
SPARQLクエリの基本構造は以下のとおりです。
PREFIX プレフィックス名: <名前空間URI>

SELECT 取得したい変数
WHERE {
  パターン(トリプル)を記述
}
LIMIT 制限数
詳しい文法の説明は過去記事がありますので、ぜひそちらも併せてご覧ください。
https://blog.jurabi.jp/sparql-rdf-dbpedia-ontology_001/
DBpediaとは
DBpediaは、Wikipediaの構造化データを活用したデータセットで、RDF形式で提供されています。DBpediaを利用することで、Wikipediaに含まれる膨大な知識をセマンティックウェブとして活用できます。利用可能なデータとしては、人物、場所、組織、作品など多岐にわたります。
- SPARQLエンドポイント: http://dbpedia.org/sparql
環境構築
必要なソフトウェアのインストール
以下のソフトウェアがインストールされていることを確認してください。
- Node.js(v14以上を推奨)
- npm(Node.jsに同梱)
Node.jsダウンロードリンク:https://nodejs.org/en
アプリのフォルダ構成
temple-explorer/
├── backend/
│   ├── node_modules/
│   ├── package.json
│   └── server.js
└── frontend/
    ├── node_modules/
    ├── public/
    │   └── index.html
    ├── src/
    │   ├── App.tsx
    │   ├── index.tsx
    │   └── style.css
    └── package.json
プロジェクトのセットアップ
-
プロジェクトディレクトリの作成
mkdir temple-explorer cd temple-explorer -
バックエンドとフロントエンドのディレクトリを作成
mkdir backend frontend -
バックエンドの初期化
cd backend npm init -y npm install express axios cors -
フロントエンドの初期化
cd ../frontend
npx create-react-app . --template typescript
create-react-app を使用して、TypeScript テンプレートの React アプリを作成します。
これでReactとTypeScriptのプロジェクトが作成されます。 -
必要なライブラリのインストール
cd frontend npm install @mui/material @emotion/react @emotion/styled axios d3- @mui/material と @emotion/*: Material-UI のスタイリング用ライブラリ
- axios: バックエンドとの通信に使用
- d3: データの視覚化に使用
バックエンド(Express)の実装
バックエンドでは、ユーザーからのリクエストを受け取り、DBpediaにSPARQLクエリを送信してデータを取得します。
SPARQLクエリの作成
まず、ユーザーが入力したキーワードに関連するお寺の情報を取得するためのSPARQLクエリを作成します。
PREFIX dbr: <http://dbpedia.org/resource/>
PREFIX dbo: <http://dbpedia.org/ontology/>
PREFIX gold: <http://purl.org/linguistics/gold/>
PREFIX rdfs: <http://www.w3.org/2000/01/rdf-schema#>

SELECT ?temple ?label ?description ?thumbnail
WHERE {
  ?temple dbo:wikiPageWikiLink dbr:{キーワード} ;
          rdfs:label ?label ;
          gold:hypernym dbr:Temple ;
          dbo:abstract ?description ;
          dbo:thumbnail ?thumbnail .
  FILTER (lang(?description) = "en")
  FILTER (lang(?label) = "en")
}
LIMIT {制限数}- dbr:{キーワード}: ユーザーが入力したキーワードを利用
- gold:hypernym dbr:Temple: お寺であることを指定
- FILTER: 英語のデータに限定(データの件数が日本語だと少ない)
APIエンドポイントの構築
作成したSPQRQLクエリを利用して、APIエンドポイントを作成してきます。backend`ディレクトリに`server.js
const express = require('express');
const axios = require('axios');
const cors = require('cors');
const app = express();
const port = 3001;

app.use(cors());

app.get('/api/temple', async (req, res) => {
  const place = req.query.keyword || ''; // 検索キーワード
  const limit = req.query.limit || 10; // 検索件数
  console.log(`検索キーワード: ${place} 検索件数: ${limit}`);

  //SPQRQLクエリ
  const query = `
    PREFIX dbr: <http://dbpedia.org/resource/>
    PREFIX dbo: <http://dbpedia.org/ontology/>
    PREFIX gold: <http://purl.org/linguistics/gold/>
    PREFIX rdfs: <http://www.w3.org/2000/01/rdf-schema#>

    SELECT ?temple ?label ?description ?thumbnail
    WHERE {
      ?temple dbo:wikiPageWikiLink dbr:${place} ;
              rdfs:label ?label ;
              gold:hypernym dbr:Temple ;
              dbo:abstract ?description ;
              dbo:thumbnail ?thumbnail .
      FILTER (lang(?description) = "en")
      FILTER (lang(?label) = "en")
    }
    LIMIT ${limit}
  `;

  console.log(`生成されたクエリ: ${query}`);
  const url = `http://dbpedia.org/sparql?query=${encodeURIComponent(query)}`;
  const headers = {
    'Accept': 'application/sparql-results+json'
  };

  try {
    const response = await axios.get(url, {
      headers,
      timeout: 20000 // タイムアウトを20秒に設定
    });
    const data = response.data.results.bindings;
    console.log('受信したデータ:', data);
    res.json(data);
  } catch (error) {
    console.error('データの受信中にエラーが発生しました:', error);
    res.status(500).send(error.toString());
  }
});

app.listen(port, () => {
  console.log(`サーバーを起動しました。at...:http://localhost:${port}`);
});
- 処理の流れ:
- クエリパラメータからキーワードと制限数を取得
- SPARQLクエリを動的に生成
- DBpediaのSPARQLエンドポイントにリクエストを送信
- 取得したデータをクライアントに返却
フロントエンド(React.js)の実装
SPARQLで取得したデータのグラフ描画
frontend/src/App.tsx
import React, { useState } from 'react';
import { Container, TextField, Button, Typography, Slider, Dialog, DialogTitle, DialogContent, Card, CardMedia } from '@mui/material';
import axios from 'axios';
import * as d3 from 'd3';

interface Temple {
  id: string;
  label: string;
  description: string;
  thumbnail?: string;
}

interface Node {
  id: string;
  group: number;
  label: string;
  description?: string;
  thumbnail?: string;
  x?: number;
  y?: number;
}

interface Link {
  source: string;
  target: string;
  label: string;
}

interface GraphData {
  nodes: Node[];
  links: Link[];
}

const App = () => {
  const [keyword, setKeyword] = useState<string>('');
  const [limit, setLimit] = useState<number>(10);
  const [data, setData] = useState<GraphData>({ nodes: [], links: [] });
  const [selectedTemple, setSelectedTemple] = useState<Temple | null>(null);

  // 検索ボタン押下時の処理
  const handleSearch = async () => {
    try {
      const response = await axios.get(`http://localhost:3001/api/temple?keyword=${keyword}&limit=${limit}`);
      console.log('受信データ:', response.data);
      const formattedData = formatData(response.data);
      setData(formattedData);
      drawGraph(formattedData);
    } catch (error) {
      console.error('検索中にエラーが発生しました。', error);
    }
  };

  // データのフォーマット
  const formatData = (data: any[]): GraphData => {
    const nodes: Node[] = [];
    const links: Link[] = [];
    const centerNode: Node = { id: keyword, group: 1, label: keyword };
    nodes.push(centerNode);

    data.forEach(d => {
      const templeNode: Node = {
        id: d.temple.value,
        group: 2,
        label: d.label.value,
        description: d.description.value,
        thumbnail: d.thumbnail?.value
      };
      nodes.push(templeNode);
      links.push({ source: keyword, target: d.temple.value, label: '関連' });
    });

    return { nodes, links };
  };

  // グラフの描画
  const drawGraph = (graph: GraphData) => {
    d3.select('#graph').selectAll('*').remove();
    const width = 1200;
    const height = 800;
    const svg = d3.select('#graph').append('svg')
      .attr('width', width)
      .attr('height', height);

    const simulation = d3.forceSimulation(graph.nodes)
      .force('link', d3.forceLink(graph.links).id((d: any) => d.id).distance(200))
      .force('charge', d3.forceManyBody().strength(-300))
      .force('center', d3.forceCenter(width / 2, height / 2));

    const link = svg.append('g')
      .selectAll('line')
      .data(graph.links)
      .enter().append('line')
      .attr('stroke-width', 2)
      .attr('stroke', '#999');

    const linkText = svg.append('g')
      .selectAll('text')
      .data(graph.links)
      .enter().append('text')
      .attr('font-size', '10px')
      .attr('fill', '#555')
      .attr('dy', -5)
      .text(d => d.label);

    const node = svg.append('g')
      .selectAll('circle')
      .data(graph.nodes)
      .enter().append('circle')
      .attr('r', d => d.group === 1 ? 15 : 10)
      .attr('fill', d => d.group === 1 ? 'red' : 'orange')
      .on('click', (event, d: any) => setSelectedTemple(d));

    const text = svg.append('g')
      .selectAll('text')
      .data(graph.nodes)
      .enter().append('text')
      .attr('x', 12)
      .attr('y', 5)
      .attr('font-size', '12px')
      .text(d => d.label);

    node.append('title')
      .text(d => d.label);

    simulation.on('tick', () => {
      link
        .attr('x1', d => (d.source as Node).x!)
        .attr('y1', d => (d.source as Node).y!)
        .attr('x2', d => (d.target as Node).x!)
        .attr('y2', d => (d.target as Node).y!);

      linkText
        .attr('x', d => ((d.source as Node).x! + (d.target as Node).x!) / 2)
        .attr('y', d => ((d.source as Node).y! + (d.target as Node).y!) / 2);

      node
        .attr('cx', d => d.x!)
        .attr('cy', d => d.y!);

      text
        .attr('x', d => d.x! + 12)
        .attr('y', d => d.y! + 5);
    });
  };

  return (
    <Container>
      <Typography variant="h4" gutterBottom>Temple Explorer</Typography>
      <TextField
        label="キーワード"
        value={keyword}
        onChange={(e) => setKeyword(e.target.value)}
        fullWidth
        margin="normal"
      />
      <Typography id="limit-slider" gutterBottom>
        検索件数: {limit}
      </Typography>
      <Slider
        value={limit}
        onChange={(e, newValue) => setLimit(newValue as number)}
        aria-labelledby="limit-slider"
        valueLabelDisplay="auto"
        step={1}
        marks
        min={1}
        max={20}
      />
      <Button
        variant="contained"
        color="primary"
        onClick={handleSearch}
      >
        検索
      </Button>
      <div id="graph"></div>
      <Dialog open={Boolean(selectedTemple)} onClose={() => setSelectedTemple(null)}>
        <DialogTitle>{selectedTemple?.label}</DialogTitle>
        <DialogContent>
          {selectedTemple?.thumbnail && (
            <Card>
              <CardMedia
                component="img"
                height="140"
                image={selectedTemple.thumbnail}
                alt={selectedTemple.label}
              />
            </Card>
          )}
          <Typography>{selectedTemple?.description}</Typography>
        </DialogContent>
      </Dialog>
    </Container>
  );
};

export default App;
2. index.tsx の編集
frontend/src/index.tsx
import React from 'react';
import ReactDOM from 'react-dom';
import App from './App';

ReactDOM.render(
  <App />,
  document.getElementById('root')
);
3. style.css の作成
frontend/src/style.css
.tooltip {
  position: absolute;
  visibility: hidden;
  background: #fff;
  border: 1px solid #ccc;
  padding: 10px;
}- SPARQLで取得したデータをグラフ描画しています。
- D3.jsを使ってノード(お寺)とリンク(関係性)を描画しています。
- 詳細情報の表示: ノードをクリックすると、お寺の説明や画像をダイアログで表示します。
グラフ描画のD3.jsの詳細は以下を参考にしてください。
https://d3js.org/getting-started
アプリの動作確認
-
バックエンドの起動
cd backend node server.js -
フロントエンドの起動(ターミナルをもう一つ開き、以下を実行します。)
cd ../frontend npm start -
動作確認
- ブラウザで http://localhost:3000 にアクセスします。
- キーワード入力欄に「Kyoto」や「Kamakura」などと入力し、検索ボタンを押します。
- 関連するお寺がグラフとして表示されます。
まとめ
今回は、SPARQLクエリを使ってセマンティックウェブからデータを取得し、その検索キーワードとデータ関係性ををグラフ描画するお寺検索アプリを作成しました。
今後の展望
今回の記事を経て、品川は以下の点において展望があるのではないかと考えました。
検索粒度の向上
ユーザーが検索結果をより細かく絞り込めるようし、宗派、歴史的背景、文化財の指定状況などでのフィルタリング・ソート機能を実装したり、地図上にお寺の位置を表示し、ユーザーが周辺のお寺を直感的に見つけられるようにしたりできるのではないかと思います。
LLMとの融合
大規模言語モデル(LLM)を活用して、ユーザーの曖昧な質問や複雑なクエリにも対応できる検索機能を実装できると思います。例えば、「紅葉が美しいお寺」や「歴史的に有名な京都のお寺」などの自然言語での検索機能を実装できると思います。

